The Boring Bit Where I Have a Chat
I think one of the most humiliating feelings is being sat in a lecture hall, minding my own business and taking notes on my laptop, when, suddenly, the laptop’s fans ramp up to max speed and I watch, in a state of awe (alongside all the other students), as the laptop just takes off towards the ceiling…

…Only for the battery to die after 6 seconds and crash back onto the desk, all my peers pointing and laughing as I run out of the room, laptop clutched under my arms, blinded by the tears in my eyes, then I slip on a banana peel and suddenly all my clothes are gone and my teeth are falling out and I try screaming but I can’t make any noise and I’m trapped and everything is dark and scary and I ask myself “what sort of nightmare is this?!”…
Alas, it was no nightmare, but the average Monday feeling during my university lectorials (well, for the first few months anyway). Never a day went by when my £430 HP Pavilion gaming laptop decided not to imitate a TU-95 and then proceed to call it a day after 20 minutes of note-taking, punishing me for not bringing the bulky charger. Then, I sit there mindlessly (I mean eagerly, of course…) listening to the lecturer preach their magical technical words I pretend to understand, wondering how on earth everyone else’s £150 notebooks can just breeze through a full day of lectures and still have enough juice for a midnight Netflix-binge before it packs up and demands a recharge.
Look, I get my bargain (especially in 2023) gaming laptop has a 15.6” 144hz display, a Ryzen 5 5600H 6C/12T 3.3GHz processor, a GTX 1650 and 16GB 3200MHz RAM, not to mention an LED keyboard (green, of all colours, but it’s okay because I colour-themed it to Zygarde), and they have a baby little laptop with no specs and no personality (Eevee, in comparison), so of course their batteries will last longer, but surely, when my laptop is running Word, it shouldn’t be sat using up all its resources for it, right? I’ll illustrate with a graph I made using MS Paint (it took roughly 80% of my laptop’s battery life to make this):
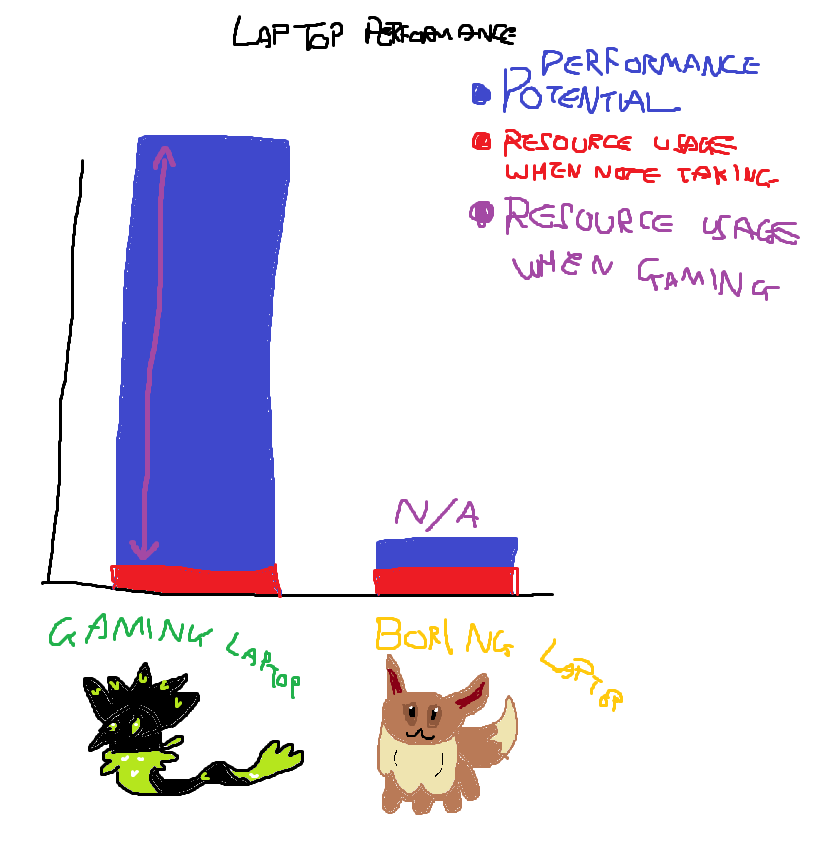
Before starting university, 200 miles away from my hometown, I figured there was no chance I was going to be lugging my big fat computer back and forth, especially as all my visits home would involve coaches and trains. So I needed a laptop powerful enough for both gaming and running virtual machines (sometimes two or three at once), which is where this laptop really shined for me! I just wished that it could last a blooming hour on battery with a Word document and a hundred prayers… a pain in the bum, to say the least.
Thankfully, however, I’m a nerdy nerd and I did some silly techy stuff to get it to actually last a few hours when I needed it to, while still being able to switch to ‘game mode’ when I’m back home with the charger in, ready to spend the next 2 hours mindlessly scrolling through games, realising they don’t excite me the way they did when I was younger and life was easier, then opting to watch a movie instead… £500 well spent I reckon.
The Less Boring Bit Where Stuff Actually Gets Done
After many a researching, these steps were what made my laptop go from lasting {time hours} on battery on an average uni day to {time hours} on battery, doing the same stuff.
1. Deactivating the Graphics Card (until it’s actually needed)
The greatest thing about gaming laptops is the wonderful presence of a discrete graphics card, but with great power comes great power-usage, making it our greatest nemesis when battery is priority.
For some reason, laptops are also stupid and decide that the graphics card is absolutely 100% without-a-doubt necessary to run a silly little note-taking app and a web browser. This usage alone is what eats up all the battery, so what we need to do is limit the GPU usage to videogames (and other intensive programs such as virtual machines) only. This will also stop the GPU fan from ramping up.
Identifying GPU-usage (when and what)
To begin, the best thing to do is a cheeky bit of reconnaissance - identifying how often the dedicated GPU is being used and what is using it.
On laptops with NVIDIA dedicated graphics
Open ‘NVIDIA Control Panel’ (either through the start menu or right-clicking the desktop), in the top toolbar, select Desktop and then check Display GPU Activity Icon In Notification Area.
On the right-hand side of the Taskbar, you should see a green or grey icon (check ‘hidden icons’ if not). Hover over it with the cursor, and it will give you some information: ‘NVIDIA [GPU] ([#] Display, [#] Programs)’, telling you your GPU model, the number of displays using the GPU, and the number of programs using the GPU, too. If you click on it, it will display a list of the programs using the GPU.
If the icon itself is green, it means the dedicated GPU is currently being used, either by a program or an external display.
If the icon is grey, it means the GPU is currently inactive - this is what we want most of the time (except when we need to use it).
On laptops with AMD dedicated graphics:
Unfortunately, AMD Radeon Settings does not have a tool quite as simple as NVIDIA’s Control Panel. There is, however, a slightly inconvenient workaround.
Begin by opening the Windows Task Manager (right-clicking the Taskbar, using the start menu, or pressing CTRL+SHIFT+ESC). Under Processes, right-click the column header row (where it says ‘Name’, ‘Status’, ‘CPU’, etc.) and check GPU and GPU Engine. You can check the Performance tab to note which graphics processor is labeled ‘GPU 0’ and which is ‘GPU 1’.
Go back to the Processes tab, scroll right, and click GPU Engine twice to group all the processes that are using one of the graphics cards. Keep an eye out for which ones are using the dedicated GPU (they may be labeled clearly, or may just say ‘GPU 0’/’GPU 1’ - so use the previous steps to identify which is which).
Regardless of what GPU you have, as long as you now have a means of identifying how often the dedicated GPU is being used and what programs are using it, we are ready to move on.
Begin by using your laptop as normal; open a couple of browsers, a couple programs (Office apps, note-taking apps, programs for work, etc.) and keeping an eye on what is using the dedicated GPU (either through NVIDIA’s tray icon or Task Manager for AMD GPUs). Note: If your laptop is connected to an external display, I recommend unplugging it and restarting the laptop for accurate results. Now, run a couple of GPU-intensive programs (videogames, 3D modelling, etc.). This isn’t quite as important, but it’s good to get an idea of what is and isn’t utilising the dedicated GPU.
Disabling the GPU
Now it’s time to make sure the GPU is only being used when it needs to be. There are few ways to do this - for the past couple of years, I’ve been using the steps under [‘NVIDIA-specific’](NVIDIA-specific - when the above doesn’t work, but, while researching for this blog post, I have been learning about the built-in Windows method, which should hopefully be a little less faff in the long run!
Windows built-in display settings - highest priority
The Windows graphics settings has the highest priority on GPU selection, overriding programs such as the NVIDIA Control Panel. So, it makes sense to start off here to disable the dedicated GPU.
Begin by going to Settings (either through the start menu or pressing ‘Win + I’), navigating to System > Display > Graphics Settings.
From here, under Graphics performance preference, you can add apps/games, click Options and select one of the following:
- ‘Let Windows Decide’
- ‘Power Saving’ (integrated GPU)
- ‘High Performance’ (discrete GPU)
Apps and programs that aren’t added to this list, or those that are running ‘Let Windows Decide’ are automatically handled by Windows, deciding whether they should use the intergrated graphics or the dedicated graphics. It does this by selecting the integrated GPU when running 2D apps and the dedicated GPU when running 3D apps, as explained by AMD, as well as some other fancy stuff such as analysing DirectX usage and GPU load expectations.
By manually select ‘Power Saving’ or ‘High Performance’ for each app, the setting overrides Windows’ automatic choice, making it particularly useful in situations where you notice a game running quite poorly and realise it’s using the integrated graphics, or if you notice that Chrome is running off the dedicated graphics and that’s where all your battery juice is going!
This is where you use your previous reconnaissance findings to start manually changing the silly things that are wrong!
In my case, for example, I found that silly things were using the dedicated GPU, like the calculator app! I only noticed because of the reconnaissance steps above, so I set that to ‘Power Saving’ for a bloomin’ start.
NOTE: To ensure this step works correctly, make sure to check your NVIDIA Control Panel and set ‘Preferred Graphics Processor’ to ‘Auto-Select.
AMD removed the ‘Switchable Graphics’ option from the Radeon Settings in 2019.
NVIDIA-specific - when the above doesn’t work
AMD-specific - when the above doesn’t work
My laptop has an NVIDIA graphics card, so I am very familiar with the steps above. AMD, however, I am yet to have first-hand experience with. Please take the below steps as a rough guide as it’s based off information I have found online.
2. Power Plans
Those two words come up all the time when it comes to battery-saving, but the Control Panel’s ‘Power Options’ is our second-best way to save some juice. Firstly, because you can set individual settings to prioritise battery life over performance and, secondly (and more importantly), because you can limit the CPU’s clock speed, which both saves power and also helps stop the CPU getting too hot for absolutely no reason and ramping up the fan.
- Word
- Word
- Word